Metal Clay and Argentium Silver Ring
In my last post, Fabricating Jewelry Settings With Wirework and Metal Clay, I explored wirework gemstone ring settings and introduced the idea of using metal clay to create a gemstone setting. I completed some of the pre-work for the ring: investment slugs made from plaster of Paris, and soldering jump ring to the ring shank to create an armature to hold the metal clay in place.
The metal clay I chose to use for this project was PMC3, a fast-fire clay that allows a variety of different firing times of temperatures. Once fired, the organic binder of the metal clay will burn away, leaving the fine silver behind.
Since most gemstones are sensitive to heat and cannot be safely fired in the kiln, plaster of Paris investment plugs, made into the same shape and size of the gemstone, are used instead. Please read up about how to make investment plugs in my last post Fabricating Jewelry Settings With Wirework and Metal Clay.


The ring came out of the tumbler very shiny except for the deeper recesses of the design and the interior of the setting. The ugly hole in the center of the ring was beginning to distress me, so I took my rotary tool and cut the setting to make a V-shaped opening on either side of the ring.


What does the carbon do? Apparently, the copper in sterling silver breaks down in high temperatures in the presence of oxygen, weakening the sterling silver. Activated carbon will bind with oxygen in metal oxides at high temperatures, thus preventing the oxidation of copper in the sterling silver.
I fired the ring in carbon at 1500 degrees for an hour then let it cool down slowly after I turned off the power. I only removed the ring from the kiln when it reached 600 degrees. I dropped the ring in the cold pickle pot again, then tumbled it for 20 minutes.
After sanding down the ring and creating V-opening on the remaining sides of the ring, I decided to make a polymer clay "gemstone" for the ring, since nothing else would fit. I mixed navy, bright blue, purple, and pearl polymer clay together to make faux lapis lazuli. After baking in the oven for 15 minutes at 275 degrees F, cooling, then dipping the polymer gemstone in some liquid floor wax, I have my new metal clay ring!


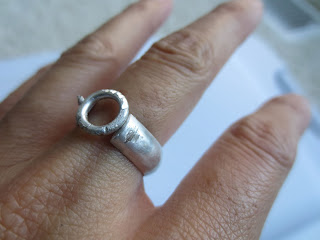
Argentium silver ring shank with jump ring armature
Creating A Metal Clay Setting
Using Investment Plugs
Since most gemstones are sensitive to heat and cannot be safely fired in the kiln, plaster of Paris investment plugs, made into the same shape and size of the gemstone, are used instead. Please read up about how to make investment plugs in my last post Fabricating Jewelry Settings With Wirework and Metal Clay.
Lump Clay Setting
Lump clay settings are the most basic metal clay gemstone setting. After applying a little olive oil to my hands, I pinched off some metal clay and rolled it into a ball shape. I flattened the ball, then pushed down the investment slug into the ball.

Metal clay ball is larger than the investment slug

I cut away the excess metal clay and removed some of the clay in the back so that the bottom of the slug could be seen.

My investment slug was slightly taller than the original gemstone so I made the metal clay flush with the gemstone. This turned out to be a big mistake. The lip of the setting is far too short to push over the gemstone.

I scraped away the excess metal clay at the back of the setting. As you can see, it's pretty rough and cracked looking because the clay was already drying out after 10 minutes of handling.
I then took more metal clay and wrapped it around the top of the ring shank, fully encompassing the armature.

The ring shank wrapped in metal clay

Sanding
After the clay fully dried, I sanded the "greenware" metal clay using a variety of sanding tools that I purchased at the local beauty supply store and hobby store. Greenware is a ceramic term for clay pieces that are unfired.

Sally Beauty Supply Store

Beauty supply stores have a section that supply nail files

The are assorted according to grit size

I purchased a variety of grits and sizes

This one is called a Sani-Block Fine with a 220 grit at $1.19/each

Yellow Ultra-Fine Polishing Buffer with 320 grit at $1.19/each

Waterproof sanding papers from Hobby Lobby
Waterproof sanding papers from 320 to up to 12000 grit are essential to finish metal clay in both its greenware and post-fired state. Starting with the lower grit and working your way up to 12000 will create a smooth and mirror-like finish.
Combining the Shank and Setting
I drilled a hole in the center of the ring shank to allow light through the bottom of the ring. It's also recommended to have a hole under the gemstone to allow for cleaning.
Using an H2O brush, I brushed water onto the top of the ring shank. Water activates greenware clay to accept additional clay. I also used slip or watered down clay, made from clay dust (from all that sanding!) and a bit if fresh clay and water.

H2O brush

This brush is really convenient to use since water is stored in the brush.
With one squeeze, water soaks the tip of the brush.

The ring shank wet with water and slip

I wet the bottom of the setting with water and slip and pressed it to the top of the ring shank.

I filled in the spaces with more clay.
Carving
After the clay dried, and started carving a zebra pattern into the clay using a Black and Decker Rotary tool. It's a cheaper version of a Dremel.

The Black and Decker Rotary Tool accepts Dremel bits

I used round burrs to carve a pattern into the ring

The "zebra" pattern ended up looking more like bark.

I drilled a hole on both sides to allow more light at the base of the stone.
Not a very good (or pretty) idea. The ring setting is also lopsided. :(
Firing Metal Clay
I purchased a beginner metal clay kiln called the Paragon Firefly from Metalclaysupply.com. It is a basic kiln which has an infinite temperature control knob to set the temperature. Since it does not have an electronic controller, all firings must be babysat by the user to ensure that the kiln remains at the desired temperature.

Paragon Firefly Metal Clay Kiln

Interior of the kiln

The Paragon Firefly comes with a pyrometer which measures the temperatures inside the kiln.

I purchased a steel shelf and shelf papers.

Kiln pillows are soft and support delicate metal clay designs

I placed my ring on the steel shelf on top of a small piece of kiln pillow

A really great book about metal clay techniques, "Metal Clay for Jewelry Makers"
written by Sue Heaser. I borrowed this from the library.

Sue Heaser recommends firing sterling silver and metal clay at 1200 degrees for 20 minutes.
It took about half an hour for the temperature of the kiln to reach 1200 degrees so the entire firing took just under an hour to complete. After 20 minutes, I cracked opened the kiln and took out the ring using cooking tongs and dropped it into my cold pickle pot that contained vinegar. The investment plug cracked immediately with a loud popping sound. After a minute, I took the ring out and rinsed it under the tap.

Both the shank and the setting were covered in a chalky white substance. This is normal after firing.

The investment plug melted away in the pickle and water.
Tumbling in the Loretone
The chalky white residue can be polished away using sanding papers, but I prefer using a tumbler. I purchased a 3 barrel Lortone tumbler from Ebay for $113 with $10 shipping. I thought it was a super deal until I found that www.therockshed.com sells it for $110 with $12 shipping. Amazon sells one with 2 lbs of steel shot.

Lortone 3-1.5B Tumbler

Ceramic Polishing Media from Rio Grande
I filled a barrel 2/3 full with ceramic media from Rio Grande, dropped the ring in, and tumbled for 20 minutes. I did not add any water or any other liquid. Most books recommend that you add enough water to cover the tumbling media and add a drop of dishwashing detergent.

The ugly hole is gone!


I placed the tourmaline inside the setting but there is only 1mm lip around the stone.

The openings on the side of the setting let in light.

Disaster
Using a bezel pusher, I tried to push the side of the setting over the stone and the metal cracked! After further reading, firing PMC3 metal clay at 1200 degrees creates a strong metal but it's very brittle. Only if fired at the 1600 for 2 hours, will the metal be its strongest and most flexible. However, sterling silver will turn liquid at 1600 degrees so this was not an option for me, since the ring shank was made of Argentium silver, a type of sterling silver.
What to do with a broken ring?
After more reading, I decided to re-fire the ring at a higher temperature to strengthen the ring. Sterling silver metal clay can be fired with sterling silver findings at 1500 degrees if placed under carbon in a lidded fire-proof vessel. I had a stainless steel container from an earlier purchase; I also had carbon since I use this media for my aquarium fish filters. I love it when my interests are complimentary!!

What does the carbon do? Apparently, the copper in sterling silver breaks down in high temperatures in the presence of oxygen, weakening the sterling silver. Activated carbon will bind with oxygen in metal oxides at high temperatures, thus preventing the oxidation of copper in the sterling silver.
I fired the ring in carbon at 1500 degrees for an hour then let it cool down slowly after I turned off the power. I only removed the ring from the kiln when it reached 600 degrees. I dropped the ring in the cold pickle pot again, then tumbled it for 20 minutes.
A New Ring with Polymer Clay
After sanding down the ring and creating V-opening on the remaining sides of the ring, I decided to make a polymer clay "gemstone" for the ring, since nothing else would fit. I mixed navy, bright blue, purple, and pearl polymer clay together to make faux lapis lazuli. After baking in the oven for 15 minutes at 275 degrees F, cooling, then dipping the polymer gemstone in some liquid floor wax, I have my new metal clay ring!


The ring is even now, after sanding the top.

Conclusions:
- Sanding tools can be cheaply purchased at beauty supply stores.
- Use sandpapers of low to very high grit to create a final finished look to your metal clay before firing.
- Make investment plugs to fire in place of your original gemstones.
- Make sure you set the stone 3mm below the surface of the clay to ensure that you have enough metal to push over the stone to hold it in place. My stone was set only 1mm below the surface.
- There is a high degree of cracking failure if you try and bend metal clay that is fired below it's optimum temperature of 1650 degrees F and for a duration of 2 hours.
- If you fire sterling silver (or Argentium silver) with fine metal clay, raise the temperature to 1500 degrees F and fire for at least an hour. It's important to fire the piece under carbon in a covered fire-proof vessel to prevent the oxidation of the copper in the sterling silver.
- Rock tumblers save time and effort polishing your fired metal clay pieces. Ceramic media works well dry. I will add water and some liquid soap the next time around.
- If you make a mistake, don't give up! Your piece can be made into something else.
Please read about my second attempt at a metal clay setting: Metal Clay and Tourmaline Ring.


