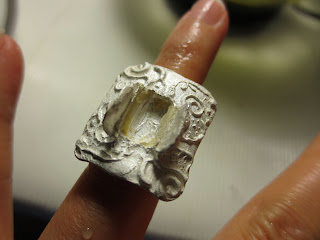
Metal Clay and Tourmaline Ring
Designing a Tourmaline Ring Using Metal Clay
Last week, I used metal clay for the first time and made a ring made of metal clay and Argentium silver. Although this first attempt was a failure since I couldn't set the stone it was designed for, I did learn the following:
- how metal clay can be fired successfully with Argentium silver;
- how metal clay shrinks during firing;
- and how NOT to set a stone in metal clay.
For my second project with metal clay, I decided to try ring design by Hattie Sanderson, called Hattie Texture Mat #55109. This texture mat has a graduated ring shank and beautiful textured pieces that are easily customized. I will be using this design to create a ring to set the tourmaline from my first metal clay experiment. This would be third attempt at setting this particular stone, having tried wirework and metal clay already!
This is Hattie Texture Mat #55109 detail
Glycerin to Extend Metal Clay Work Time
While I was working with metal clay for the first time, I found that within 10 minutes of manipulating the clay, it would begin to dry and crack. I did some research and found that if I added a few drops of glycerin, the metal clay would stay moist.
I pinched off a1/4 piece of a 50g packet of metal clay, added a few drops of glycerin, and kneaded it while it was wrapped in some plastic wrap. I let the clay rest overnight and then tried it the following day. The glycerin extended the work time to 25 minutes!
However, even with this extended work time, I found it difficult to take pictures as I required every minute to form the clay.
Glycerin purchased at Walmart in the drugs aisle for under $5.
Lavender Oil
Lavender oil is another additive to metal clay that can also extend the working time of clay. However, it's used mostly to make an oil paste for connecting fired pieces of clay. A lavender oil recipe can be found at crafting.squidoo.com and Riogrande.com. The articles discuss in depth how to make oil clay as well describe how well it bonds pre-fired metal clays.
I purchased 100% lavender oil from Amazon
Shaping Metal Clay
Since I'm just a beginner, I limited my shaping tools to the essentials. I found most of them at the local hobby stores, Michaels and Hobby Lobby.
Water brush from Michaels. With a small squeeze, you can have water at your fingertips!
Sculpey 5-in-1-tool can be found in the polymer clay section of the hobby store.
Soft-tipped silicone color shapers can be purchased at Amazon.com
Wilton Fondant Rolling Pin with thickness guides.
Forming the Metal Clay Shank
Before working with metal clay, I coat my work surfaces, rolling pins, textures, and hands with a light coating of olive oil. This prevents the clay from sticking to my hands or tools and keeps the clay moist.
To make the ring shank, I roll out a small grape sized piece of clay into a long flat piece that covers the shank pattern of the texture mat. I use the pink thickness guide on the Wilton rolling pin which is roughly 1mm. After I firmly press the clay into the mat using my finger tips, I gently peel the clay from the texture mat and wrap it around an investment plug that I had made a few days before.
Investment plugs are essential when firing metal clay ring shanks as they prevent you ring from shrinking too much. I chose a size 5 size, one size larger than my sister's finger size of 4 to accommodate metal clay shrinkage during firing. You can learn how to make ring investment plugs by reading my post Fabricating Jewelry Settings with Wirework and Metalclay.
I also wrapped the plug in parchment paper to prevent the wet clay sticking onto the investment plug.
I will use a size 4 plug during the firing without the parchment paper.
Forming the Metal Clay Setting
I used the rolling pin again to flatten a small piece of metal clay to cover another section of the Hattie Texture Matt. After removing the clay from the texture mat, I pressed the tourmaline gently into the center of the clay. I removed the tourmaline and cut an opening made by its impression. I placed the clay onto a small can of tomato paste lined with plastic wrap so that the clay would dry in a curved shape.
Using a food can to shape the ring setting
Forming the Metal Clay Setting Prongs
After the clay dried overnight, I placed an investment plug copy of the tourmaline into the hole. It fit perfectly! To prevent damaging the tourmaline during firing, I am using an investment plug instead of the stone. You can learn how to make investment plugs in my post, Fabricating Jewelry Setting with Wirework and Metalclay.
I pinched off two baby pea size pieces of clay and pressed them into the texture mat and formed two flat pieces of clay. Then I took my water brush and wet the opening of the setting. This activates dry clay so that it can bond with wet clay.
Using a water brush to wet the dried clay
I painted some metal clay slip onto both the soft pieces of clay and the dried setting and gently squished the wet and dry clay together. In retrospect, this was mistake; I should have waited for the clay to dry before trying to attach it to another clay piece. Because I used wet clay, my metal clay "prongs" were both asymmetrical and poorly shaped.
Clay slip is a thick paste of metal clay and water and used to adhere two metal clay pieces together.
Metal clay prongs attached to the dry clay using water and slip.
Since I attached them wet, they are not symmetrical and flat.
Firing the Metal Clay + Argentium High Fire Experiment
Since I was only firing the ring in the kiln, there was some space to try another firing experiment with Argentium silver.
I took an small Argentium silver gallery wire setting that I had soldered together a year ago and placed it onto a pile of charcoal that was sitting on top of kiln paper. I then carefully placed it into the kiln and poured more charcoal on top. If you try this experiment at home, make sure you vacuum any pieces of charcoal that happen to fall off the kiln paper and onto the kiln bricks. The charcoal leave hole in the firebrick after firing!
Argentium silver gallery wire from Riogrande.com
The charcoal is to prevent the copper in the Argentium silver from oxidizing
and weakening the metal after firing
After firing for 2 hours at 1650 degrees F, I let the kiln cool down until 600 degrees before taking the ring out using a spoon.
The ring was covered in a white coating, which is normal. The investment plug kept the stone setting from shrinking too much.
From the side view, we can see that the ring has shrunk from a size 5 to a size 4 ring.
When the hot ring was placed in water, the investment plugs immediately started to disintegrate. After about 2 minutes, the plugs were soft enough to scrape away.
From this pictures, you can see that the charcoal has completely burned up. According to my research and experience, Argentium silver can be fired at 1500 degrees in a vessel under coal for an hour. Perhaps if I placed the gallery wire in a vessel with the charcoal, it would have survived the firing?
Setting the Tourmaline in the Metal Clay Ring
It took me two days before I had the nerve to set the tourmaline. I was worried that the metal would shatter like my first metal clay ring, or that I may crush the stone while pushing the prong.
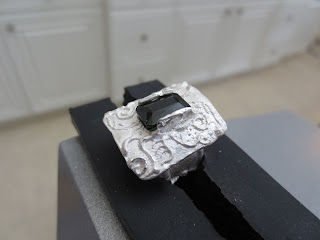
I wiped my counter with a damp cloth, set and locked down my mini- vise, and carefully installed the ring in the rubber lined jaws.
The moment of truth...
I first tried to use the bezel pusher, but the metal would not bend at all. I was very afraid of slipping and damaging both the stone and the ring.
I brought out my jewelry pliers and the metal easily bent towards the stone. However, one prong was thicker than the other, so only one side bent well. I used different pliers, moved the angle of the ring, and used the bezel pusher a number of times before I pushed the the prongs close enough to hold the stone.
I had a few scary moments when I slipped and chipped off some metal from the edge of the prongs. Luckily, I neither broke the prongs nor the stone.
Finishing the Metal Clay Ring
I filled my tumbler with small ceramic media from Riogrande.com, water and a drop of dishwashing detergent and tumbled my ring for half an hour. Then I took out my Black and Decker rotary tool and attempted to polish it with Zip buffing compound and a small metal brush from my Dremel kit. I stopped when I realized that it was heavily staining the ring.
I tumbled the ring again, but the stain still remains on the ring. I showed the ring to my husband, and he said the the dark stain actually brings out the design in the ring. For now, I will leave the stain on the ring until I research how to remove it.
The final result:
As you can see, the prongs are not even and one side is chipped :(
The shank and the setting have a very strong connection.
The tumbler polished all the white residue away.
Conclusions:
- When forming prongs for a tourmaline setting, roll out clay using guides so that all the prongs are uniform in thickness.
- Let the prongs dry so that they do not become misshapen while connecting them to the main body of the setting.
- Do not let charcoal touch the kiln brick during firing as it will burn crevices in your kiln.
- Argentium silver did not survive fired at 1650 for two hours under my kiln's conditions.
- Do not use steel wire brushes that come with Dremel bit kits. They stain your silver badly!
- Gem setting is really difficult and I may need proper training in this area in the future.
Thanks for reading! Please come again soon!


