Watering Your Garden With a Drip Auto Watering System
Container gardening is one of the easiest ways to set up an efficient, easy-care vegetable garden. This style of gardening is also well suited for small gardens. I like to plant a variety of different plants: Japanese eggplants, tomatoes, zucchini, berry fruits, beans, and herbs. To increase the number of plants, I use stackable or vertical planters in addition to 5 gallon wide mouth planters as they allow adequate soil and surface space to plant multiple plants or large plants.
10. Water filter is optional. I use a carbon water filter to ensure that the water is free of pesticides, drugs, and pathogens.


Planning
I purchased a drip irrigation kit that contained tubing, emitters, and connectors (see below in Shopping List).
You can also purchase the irrigation pieces separately at your local big box hardware store. You will need:
1. Tubing, both 1/2" and 1/4" tubing
2. Emitters in different flow rates. I use .5 GPH, 1 GPH, and 2 GPH emitters.
3. 1/4" Drip Irrigation Tubing Stakes
4. 3/4" garden hose adaptor that connects your water timer to 1/2" tubing.
5. Drip irrigation hole punch and drip irrigation emitter tool
6. 1/4" Drip irrigation closure (goof plugs)
7. 1/4" Drip irrigation barbed couplings
8.
9. 360-degree drip irrigation micro umbrella spike
9. 1/2" drip irrigation tubing end closure
Putting It All Together
a) Add batteries to the timer and attach to the spigot. Then attach a short (5 to 10 feet or shorter) garden hose to the outlet on the timer. I use a normal garden hose as I use a water filter. Use can use a drinking safe water hose if you do not use a water filter.
b) Attach the water filter to the end of the garden hose. On the outlet of the water filter, attach the garden hose adaptor. I use a short hose protector that is drinking water safe to connect the garden hose adaptor so to prevent damage to the filter. You can use a short drinking water safe hose instead if you can't find one.
c) Measure the length of 1/2" tubing you will need to reach from the filter or timer to the LAST planter. Then add 3 feet and cut with a scissor.
d) Attach 1/2" tubing to the garden hose adaptor by pushing the hose into the barb fitting. Make sure its secure.
e) Using the drip irrigation tubing closure, seal of the end of the 1/2" tubing by making folding it at roughly 4" and threading the tubing end closure so the fold in the tubing is tight. The 1/2" tubing is now ready to use and is water tight.
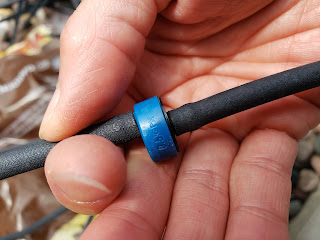
f) Using the drip hole punch, make a hole where your first planter is located. then insert a 1/4" drip irrigation barb using the pink drip irrigation tool.
g) Measure the length of 1/4" tubing that will go from the irrigation barb to the center of your planter. Then add a foot and cut.
h) Attach the 1/4" hose to the irrigation barb. Take your irrigation tubing stakes and clip off the tube insert and attach it to the end of the 1/4" tube. Finally, attach the irrigation stake. Your 1/4" irrigation line should look like this.
h) Push in the stake into the the planter.
Repeat steps e through g for each planter.
Testing the System
Turn on your spigot by turning one 1/4 turn. On the timer, press the "manual" button and set the time to 3 minute using the minus button. The water will run for 3 minutes. Look at the water flow at each emitter and note which is too slow and which is too fast.
The emitters that are too fast, cut the 1/4" line 2/3 of the way and attach a 2 GPH flow emitter. Run the water again for 1 minute. If the flow is still too fast, replace 2 GPH emitter to 1 GPH. The slowest emitter is 5 GPH. When you have chosen the emitter, then attach the short end of the 1/4" tubing with the tube insert and stake.
If the emitter is too slow or none of the emitters give you the correct flow, remove the tube insert and stake and attach a 360 degree emitter spike. This emitter can be adjust by turning the head to increase or decrease flow.
After all the emitters are flowing at a good rate, program your timer. I turn on my water every 12 hours for 5 minutes. If it's really hot, I increase the duration to 7 minutes.
Shopping List
I purchased my drip irrigation components from Menards and Amazon. Below are links to the products from Amazon.
 |
Mr. Stacky Large Vegtable Garden Planters |
 |
Single Stage Water Filter For Garden Hoses |
 |
Drinking Safe Water Hose 5 Feet To attach faucet to water filter |
This allows you to use your spigot while the timer is attached.
 |
These are low priced but need to be used with a planter saucer to retain moisture. |

I use the regular size watering stakes but I plan to use these ones for my raspberry and blueberry bushes when they are larger.
Please Support ❤️
This page may contain affiliate links to products I use and/or recommend. If you purchase something through a link from this page, I may receive a small percentage of the sale as compensation at no extra cost to you.🌻More Reading🐞
I posted a tour of my garden so you can see the results of the auto watering systems.
I use Neem oil to control the Japanese beetles invading my vegetable garden. Please read about my DIY Neem Oil Insecticide for Japanese Beetles.


Comments
Post a Comment